Friday, August 7, 2015

Blackberry Hell

I love blackberries. The post title is just a play on the previous post- Blackberry Hill.

The amount of berries is truly awe inspiring.

You know those shopping baskets in the supermarket? I fill one of them in an hour picking alone, less if we go as a family. I just don't know what to do with them anymore. I have tried drying them on windowscreens in the sun. They were so plump they are still drying. We juiced about 10Kg of them. Ran out of space. Frozen blackberries fill every cranny of our freezer. Jam- our friends run away when they see me coming with a bag full of jam jars. We filled gallon jars with berries and vodka- can't drink that fast enough (and probably shouldn't of course). Every morning a blackberry smoothie from the frozen berries that is so thick it is like ice cream.

But still I get more. And still I want more! And then tonight, the wife called me at work and told me to bring home blackberry leaves too so she can make tea...


Friday, June 5, 2015

Blackberry Hill

Today, my wife showed me the holy grail of blackberry patches.
The photos can't do it justice. The owner of the garden started with two or three potted blackberrries three years ago. This year she conservatively estimates harvesting 200kg (440lbs) of blackberries. It was awe inspiring!

Thursday, February 12, 2015

Avocado dreaming

Is it just me or does that look like my two year old avocado in a self watering planter is about to bloom!?

I grew it from seed and kept it indoors over the winter.

Friday, November 7, 2014

Aquaponic strawberries

Well, the aquaponic strawberries have not done as well as I had hoped. I think I might need more fish. But this berry I picked today was sooooooo goooood!

Saturday, October 4, 2014

Surprise Vegetables

Today I finally got around to weeding around the greenhouse and the road garden. To my surprise some carrots and a potato somehow survived the Weedpacalypse.

Friday, September 26, 2014

Passion fruit

This year, the greenhouse has yielded some very nice Passionfruit. I just wait for them to drop, and leave them on the kitchen counter until they are a bit wrinkly.

Thursday, September 18, 2014

Indian Blood Peach Season

Mmmm peaches


Saturday, August 30, 2014

End of August


The end of August means the end of summer for me. Sure it is still hot. But the heat has lost something.... It's hard to explain, but I am sure you know what I mean. It might happen earlier or later in your area, but summer is winding down. It makes me kind of sad in some ways, but the promise of those perfect fall days that are right around the corner lift me up in other ways.

The kids are going back to school on Monday, and the local pool will shut down on Sept. 10 for the year. We ate the last watermelon (besides the one the crows got because the kids forgot to shut the greenhouse door... grrrr) at the beach, and tomorrow is the last summer BBQ. Of course then we will have autumn BBQs. So that is not such a big deal. So here is just a post full of pictures of what was a really awesome summer. Too awesome to spend much time writing blog posts- sorry about that.

My secondhand greenhouse- tomatoes on the left, watermelon, zucchini, and a papaya in the middle, eggplant, peppers, passionfruit on the right

The volunteer fireman's BBQ party

Our new garage (made of recycled wood) and mini-van. 

His head really isn't that big. It is just the camera angle.

The house before re-staining

And the house after 24 liters of Xyladecor exterior wood stain.
The roof peak was a bit scary on just a ladder. Glad I won't have to do that again for a few years.


And the eldest pwning a watermelon at the beach.


Sunday, April 13, 2014

Bamboo Shoots


The bamboo shoots are coming up. The only reason this one escaped was because it was in my backyard. The boars are pretty thick this year, and they can smell shoots before most people find them.

Monday, March 24, 2014

Tire Recycling is Fun

About 12 years ago, I was really, really into composting. I fretted about C:N ratios, I tweaked what I put in it, and worried if it didn't heat up "enough." Then I realized that quite frankly- compost happens. But one good thing did arise from my obsession- someone recommended I build a composter from Paul Farber's plans in his epic "Tire Recycling Is Fun." (it has since been updated and re-branded as "Tirecrafting" but the basic premise is the same).


It is an awesome book. The very well done illustrations made it much easier to follow than pictures would have, and it is written in a very engaging style that makes you want to try it! I rushed out and made a Grecian urn from a rusty bias tire with rim I found on the beach (still has tulips planted in it) and then.... ran out of space and time for a while. A few years back I re-read it and made some garden edging from tires someone had thrown out beside the road. Then I re-read it about a month ago and decided to make a composter, since I had found four enormous truck tires beside the road recently. (And as a funny coincidence, one of my favorite blogs: "The Walden Effect" recently had a post about using tires in the garden, which prompted me to post my experience.)
Excerpt from Tire Recycling Is Fun

I loaded the tires up in my truck, drilled holes in the sidewalls and started in with my jigsaw and a plywood blade. Worked fine. Take it slow and don't overheat your jigsaw. When I was finished I had a stack of tires without sidewalls that was about a meter high, and about a meter in diameter. In the book, he describes the major advantage to ring composting- mixing. Pull the top tire off and it scrapes the material down. Put that tire next to the stack and shovel the unfinished compost into it. Then do the same for the others. When you are done, the compost has been mixed and inverted with very little effort (comparatively).

Tire composter with lid (to keep out the crows)

Tire composter full.

Perfect! I thought- what can I do with the sidewalls? And it struck me- these would be perfect rings around fruit trees! They could hold mulch in them, give a definite boundary to trim to with my string trimmer, and they will last pretty much forever. Fruit trees seldom get so big that the rims would choke them, it just seems like a natural idea.

Tire sidewall mulching ring


Wednesday, February 12, 2014

2014 February 7-8 Blizzard

Or to use a more media popular name "SNOWPACALYPSE 2014"
2014 Japan "Snowpacalypse" (click to enlarge)
Yep. We got about 50cm (1'7") or so of very wet heavy snow. Most of you back home think- Well, that's a fair amount, but not really a tragic event.
Panorama from the living room window (click to enlarge)
You can see the hydroponic strawberries on the left by the fence

Imagine if you had no plows. If you had no rocksalt and sand. Imagine that your streets were only 16' wide, with walls on both sides.
My Bench!!! and the bus stop

Even with daytime temps of 7-8 (mid 40s F) we have a lot of snow to melt. It truly was a snowpacalypse here.
Dog and goats at a loss of what to do

But the city's skiploader that doubles as the "plow" finally made it to our driveway at 1:00 on Monday, so I was able to get on the bike and go to work. Man, that was a lot of damage. If you don't get heavy snows for 20 years, the trees don't grow expecting it, and MAN, a lot of them just shattered! About 10-20 meters up, they just shattered and the tops fell off. So our mountains look like... well, cedar plantations with a lot of toothpicks sticking up here and there. (You have to realize, there are thousands to tens of thousands of trees on each mountain, if one percent of them shattered, that is a lot of trees, but still only one percent)
Concrete power poles are not supposed to have a visible bend in them....

Just how heavy was that snow?!?!
Well, it is all over but the cleanup, and I got a lot of cheap wood. (I am a firm believer in burning cedar in my woodstove). The neighbors laugh at me, but my house is a comfortable 20-25 degrees, so I laugh back at them, trying to split knotty hardwoods while 15" cedar splits when I just grip my maul and look at it sternly.
And it dries faster than their hardwoods, so I get more heat value then they do.

Monday, January 27, 2014

Rescued Paulownia Dresser

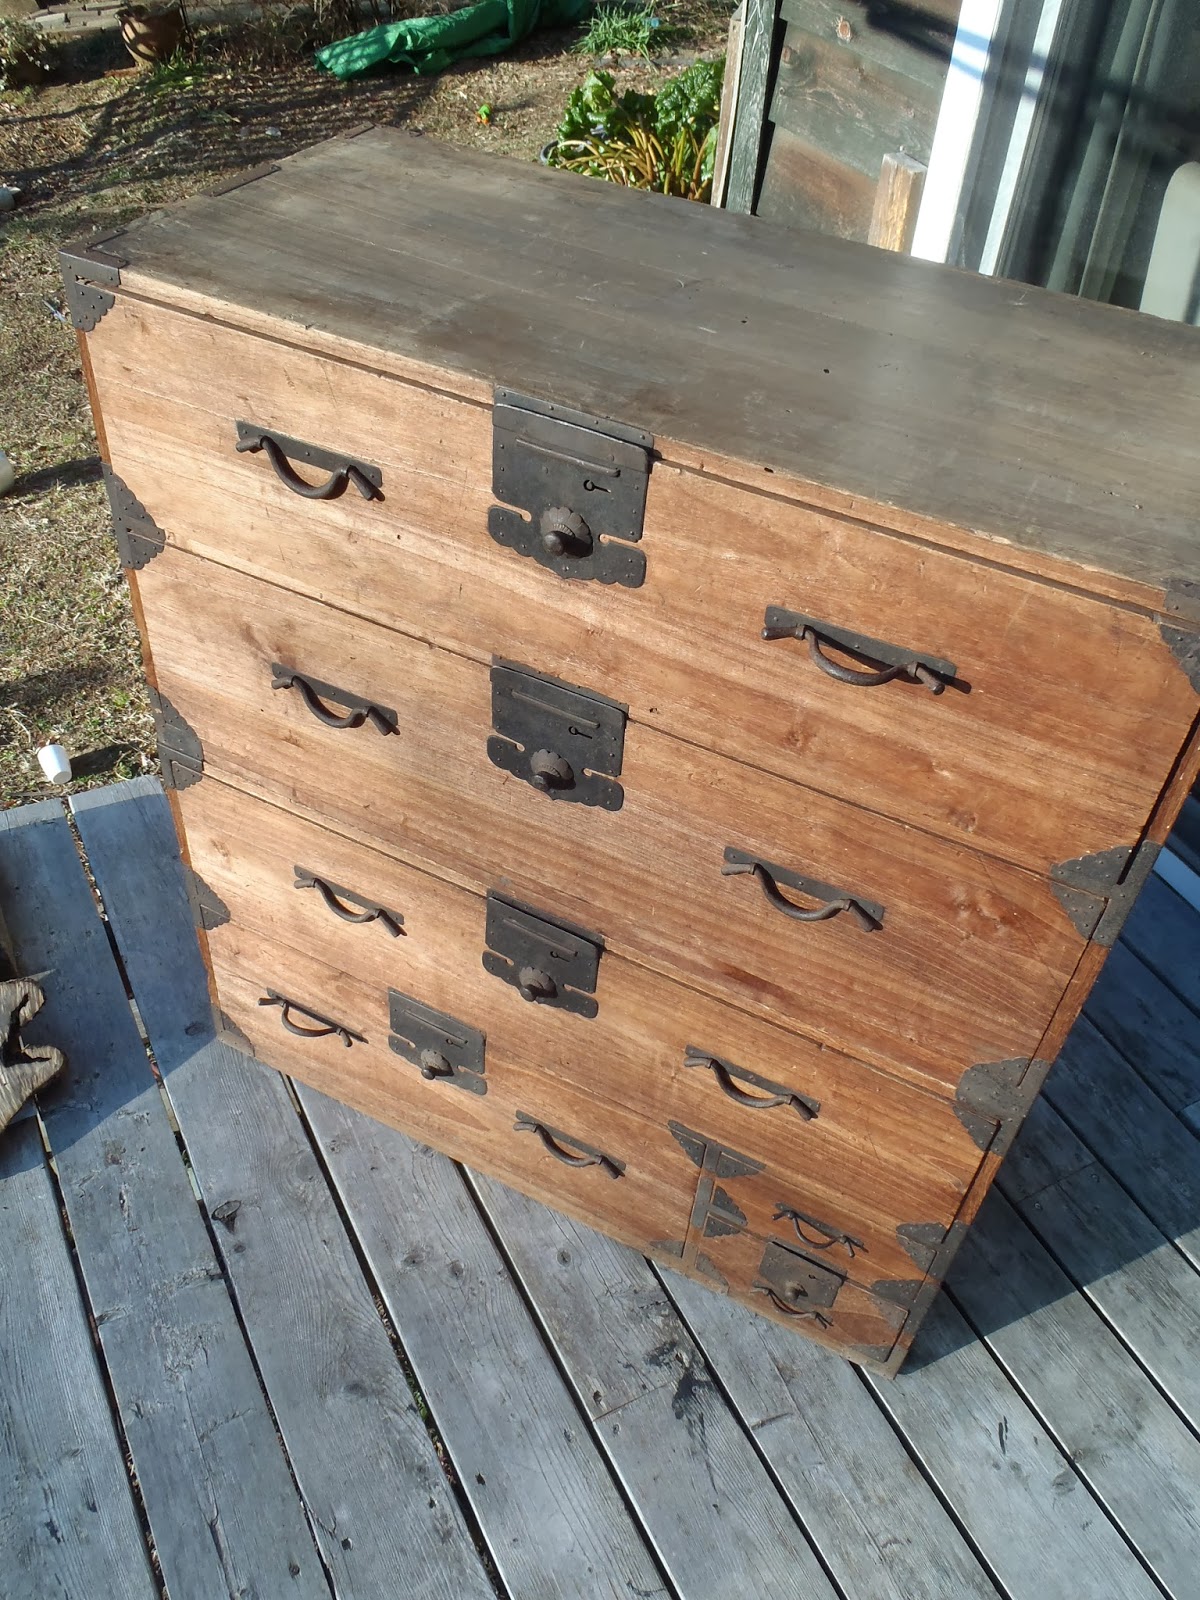
We decided to hire a guy to redo our driveway and parking space. And what a guy! He can do anything, and he gave us a year's worth of firewood to boot! Part of his job is pulling down old houses, so he tries to recycle any decent beams and posts. AND HE GIVES THEM AWAY!!! Our dream of adding a guest house is starting to look possible.  Also, as part of the demolition process, he often unearths antiques, collectibles, and some retro items that the customers give him. They are not always in the best of shape, but they aren't broken either.

Well, these things pile up, and he and his wife like to see them re-used. When we told them of our love of Japanese antiques, he showed me this beauty he got demolishing a doctor's house..
Rescued Paulownia dresser
It is quite scratched and worn, but amazingly all the fittings are whole (but rusty) and it looks amazing!
We have been looking in recycle shops for a dresser for our daughter, and now one just falls from the sky. 

Now I just need to figure out how to take care of it. Do I oil it? Polish it with a soft cloth? How would you care for 100 year old paulownia wood?


Tuesday, January 7, 2014

Aquaponic Strawberries

Well, making the hydroponic strawberry system was so simple, I thought I would add one to my aquaponics system as well. Then I can compare yields and flavor.
I realized that I don't need to build a pvc pipe stand for the grow tubes. They will do just fine supported by... well, anything! So I just measured to the top edge of the grow box, and calculated that for a 1% drop, I would need to lift the inlet four centimeters from the grow box, the far joint two centimeters, and just rest the exit on the media in the grow bed. Works great!
Then I planted twenty strawberry starts in vermiculite pots with wicks and set them into the holes. 
This was ridiculously easy to do.
Drilling the holes with my hole saw
Changing my PVC pipe to some garden hose.
Hill and Bourne don't seem to mind.
Planted 20 new strawberry plants in the aquaponics system!


Friday, December 13, 2013

Hydroponic Strawberries

Here it comes! I finally made a hydroponics setup!
I wanted to make one for a long time, searching on the internet and on YouTube. Have you ever noticed how if you type "hydroponic" on YouTube you get about 10,000 videos made by stoned college students showing their "secret" marijuana closets to the world? (hint- it's not secret if you show your face and post it on the internet... And at least film them when you are sober)

But anyway, I found one video which-although the man was clearly planting lettuce at some sort of public facility has the title "How To CHEAP Hydroponic System Hydro Grow Marijuana Weed Tutorial." (the video has since been removed) It was a very concise video about how to make a simple, cheap system with a minimum of tools. So I am going to grow some hydroponic strawberries. I am so excited about this, I made a paper tutorial as well!

You can easily make this an aquaponics setup by adding fish and a bed of media for bacteria to colonize. I plan on doing that in the near future to compare. But I already have an aquaponics setup, and I want to try a hydro now. I also have 18 new strawberries in the old rice paddy, so I can compare three types of growing.

A bit of advice- You can change some of the details. If you can't find the same sizes, materials, or tools, just adapt and adjust. It is basically water flowing downhill through tubes.
Hydroponic Strawberries 1/3
(click to enlarge)
Hydroponic Strawberries 2/3
(click to enlarge)
Hydroponic Strawberries 3/3
(click to enlarge)


1. Materials you need:

  • one- five gallon/ 20L bucket.
  • one- roll of electrical tape
  • two- 75mm x 200cm PVC pipe (six to eight feet of 3" pipe is fine)
  • one- 75mm x 15cm PVC pipe (You can cut 6" off of the pipe from above. It'll still work OK.)
  • three- 25mm x 200cm PVC pipe (six to eight feet of 1" pipe)
  • three- 75mm  90 degree PVC pipe joints.
  • eight- 25mm  90 degree pipe joints
  • 20 plastic cups or hydroponic net cups
  • 1 small roll of a rather thick, unwoven (like felt or garden row covers) synthetic cloth. Filters are often made of this material
  • 1 aquarium pump
  • 60cm (2 feet) of garden hose that fits the aquarium pump.
  • 1 bag of hydroton, perlite, vermiculite, or the growing medium of your choice.
  • hydroponic nutrient solution. 
2. Tools:
  • box cutter or knife
  • saw
  • tape measure
  • marker
  • electric drill
  • hole saw (my holes are 57mm (2.25") diameter- (1 1/8" radius) you can adjust this to your needs)

3. Measure and cut: 

The 25mm (1") PVC is for the base. Measure (twice!) and cut:
  • 30cm x 2        (12 inches)
  • 40cm x 2        (16 inches)
  • 45 cm x 2       (18 inches)
  • 170 cm x 2     (68 inches)
* make a cut diagram if you are using longer or shorter PVC pipe than I listed.

The 75mm (3") PVC is for the grow tubes. 
Draw a straight line down the pipe (a 2x4 on the floor next to the pipe can help you make the line nice and straight)
Start 10cm (4") from one end and mark the pipe at 20cm (8") intervals on that line. 
Use the hole saw and electric drill to cut out holes along the marks. 

4.1 Assembly of Base
  • Attach one 30cm crosspiece to the 40 cm legs with the 90 degree joints. 
  • Attach the other 30 cm crosspiece to the 45 cm legs with 90 degree joints. 
  • Lay the 170 cm pipes on the floor, and attach them to the two end pieces you just made with... you guessed it, the other four 90 degree joints. 
  • It should look like a really wiiiiiiiiiiiiide "U" with one side 5 cm shorter than the other. 
4.2 Assembly of Grow Tubes: (see illustration)
  • Put 90 degree joints on both ends of one grow tube, then lay it on the base.
  • Put the short, 15cm connector on the shorter, 40cm side of the base, and connect it to the second tube with a 90 degree joint.
  • The second tube PASSES UNDER THE 45cm support and must be tied or taped into place with electrical tape.
  • Secure the grow tubes to the base with lashings of electrical tape.
  • When the holes of the grow tubes are all arranged properly up, use electrical tape to seal the joints
  • Put the 5gal bucket under the lower pipe exit.
5. Planting:
  • Prepare the cups- cut a small slot in the bottom of the cups with a utility knife/ box cutter
  • Cut strips of cloth to use for wicks. About 2.5 cm (1") wide and 15cm (6") long
  • Thread them halfway through the slots in the cups.
  • Fill the cups about halfway with growing media (perlite, peat moss, coconut coir, hydroton....). Arrange the wick so it is standing up, not crushed to the bottom under the media. 
  • Put in your strawberry plants and fill the rest of the way. Make sure you don't cover the crown of the berry.
6. Starting Up:
  • Place your prepared cups in the holes of the grow tubes, making sure the wicks are touching the bottom of the grow tube.
  • Put your aquarium pump in the bottom of the 5 gal bucket below the lower pipe's exit.
  • Attach the 60cm garden hose to the pump, and lead it to the upper pipe's entrance.
  • Fill the bucket with hydroponic nutrients (follow their instructions for mixing proper amounts)
  • Plug in the pump and let it run. 
  • Top off the nutrient solution as necessary.
Notes: 
  • You can use this system with just about any non- root vegetable. i.e. carrots and potatoes are not suited for this, but lettuce and bok choi are.
  • To prevent algae growth, keep the nutrient solution out of the sun as much as possible. Devise a cover for the bucket, etc...
  • I use unwoven poly cloth for the wicks, but almost any cloth will work. Natural fibers will decay quickly though.
  • Your growing media can be just about any inert media, not just the lightweight expanded clay aggregate in the illustration. Coconut coir, perlite, vermiculite, pea gravel, etc...

Saturday, November 16, 2013

Blue Hubbard "Cheese"


A "Cheese" of Blue Hubbard Squash puree
Squash juice.... maybe I should call it "tea" and it is more appetizing? 
So, I just steamed 1/4 of a 32lb blue hubbard squash... Yes, 8lbs.... . Then I mashed it with my handy fork, and oh my goodness, what a wet sloppy mess that was. The last two pies I baked with this mix took 2x the normal baking time.

Then I remembered how to make yogurt cheese- just add some herbs to plain yogurt, dump it into a clean handkerchief, hang and drain.... could it work for squash too?

So I decided to make a "cheese" of the steamed squash. I lined a colander with a clean handkerchief, and put the pureed pumpkin into it. Wow, did it drain! Amazing!  Then I tied the handkerchief and hung it by some twine and let the water drain into a bowl. Wow did it drain more! Totally amazing the amount of water in steamed pumpkin! I have the other 1/4 in the oven baking at 350 F. (our oven is from the US, so it cooks in F, not C.)

I wonder how long I should suspend this "cheese" of squash. Overnight seems excessive, but 20 min in, it is still draining pretty steadily....
The pyrex measuring cup was up to 500ml when I decided I needed to do something- and thus the Squash-Sweet Potato cocktail was invented (don't try this at home, it really isn't that tasty).
I took 150ml of the squash and added 50ml of 60 proof imo-jouchu (distilled sweet potato liquor) to it. The fruity blend of the..... forget it. It is not a good drink. Might be better with a cleaner liquor like vodka.
Maybe as a hot breakfast tea.... without the liquor of course!

I turned off the oven, the rest of the squash should be tender by morning.... I hope!

Wednesday, October 23, 2013

Kabochataro, or Little Squashling

Kabochataro and his Blue Hubbard Squash

I may not be much of a farmer, but that here is a big ol' squash. Big enough to fit a small kid into. It reminds me of the Japanese folk tale called Momotaro- or "Son of a Peach!" or "Little Peachling."

So here is the fairy tale from fairytales4u with a bit of word search and replace:


KABOCHATARO
 OR 
LITTLE SQUASHLING

A LONG long time ago in Japan there lived an old man and an old woman. One day the old man went to the mountains to cut grass; and the old woman went to the river to wash clothes. While she was washing a great thing came tumbling and splashing down the stream. When the old woman saw it she was very glad, and pulled it to her with a piece of bamboo that lay near by. When she took it up and looked at it she saw that it was a very large squash. She then quickly finished her washing and returned home intending to give the squash to her old man to eat. 
When she cut the squash in two, out came a child from the large kernel. Seeing this the old couple rejoiced, and named the child Kabochataro, or Little Squashling, because he came out of a squash. As both the old people took good care of him, he grew and became strong and enterprising. So the old couple had their expectations raised, and bestowed still more care on his education. 
Kabochataro finding that he excelled everybody in strength, determined to cross over to the island of the devils, take their riches, and come back. He at once consulted with the old man and the old woman about the matter, and got them to make him some dumplings. These he put in his pouch. Besides this he made every kind of preparation for his journey to the island of the devils and set out. 
Then first a dog came to the side of the way and said, "Kabochataro! What have you there hanging at your belt ?" He replied, "I have some of the very best Japanese millet dumplings." "Give me one and I will go with you," said the dog. So Kabochataro took a dumpling out of his pouch and gave it to the dog. Then a monkey came and got one the same way. A pheasant also came flying and said, "Give me a dumpling too, and I will go along with you." So all three went along with him. In no time they arrived at the island of the devils, and at once broke through the front gate; Momotaro first; then his three followers. Here they met a great multitude of the devils' retainers who showed fight, but they pressed still inwards, and at last encountered the chief of the devils, called Akandoji. Then came the tug of war. Akandoji hit at Kabochataro with an iron club, but Kabochataro was ready for him, and dodged him adroitly. At last they grappled each other, and without difficulty Kabochataro just crushed down Akandoji and tied him with a rope so tightly that he could not even move. All this was done in a fair fight.
After this Akandoji the chief of the devils said he would surrender all his riches. "Out with your riches then," said Kabochataro laughing. Having collected and ranged in order a great pile of precious things, Kabochataro took them, and set out for his home, rejoicing, as he marched bravely back, that, with the help of his three companions, to whom he attributed all his success, he had been able so easily to accomplish his end. 
Great was the joy of the old man and the old woman when Kabochataro came back. He feasted everybody bountifully, told many stories of his adventure, displayed his riches, and at last became a leading man, a man of influence, very rich and honorable; a man to be very much congratulated indeed!

And a word or two about the squash- it was delicious! But so big! I microwaved some and ate it with a dash of salt- delicious. I pressure cooked large cubes- two times! delicious. We made pumpkin soup. We put it into ton-jiru (Japanese pork soup). Delicious.
My only complaint was that it cooked to a mush too easily. Japanese kabocha squash are much firmer, and they don't lose their shape so easily. You can cook up cubes and serve them as cubes. This one was softer than tofu! Touch it and it just kind of melted. But that did make for very good soups and stews.
Maybe after a month or two of cool storage the other squash will be more firm. This one was pretty fresh from the garden.

Saturday, October 19, 2013

My Sticky, Hairy Balls

Mmmm.... Hairy....

Closeup of my balls
Man, I love my hairy balls!
I got the recipie... I mean recepie...reci..... My friend Anna from Walden Effect had a post on how to make them. Not a very precise recie..%$##$!. Not very precise directions, but it is not a very precise kind of dessert.

You need:

  • nuts (any kind) 1/2 cup (I used a bag of mixed nuts)
  • three kinds of dried fruit (any kind) 1/2 cup each (I used dried bananas, prunes, and mango)
  • 1 fresh lemon or other citrus (I used sudachi)
  • some shredded coconut about 1/2 cup

First, I put my nuts into the food processor and pulsed it a few times to chop them up quite fine. Then I dropped my banana into the mix. Add the other dried fruit and chop it up fine. Then add some lemon juice (in my case Sudachi) and mix it up so it is sticky. Then just roll them between your palms until they are round, and (this is the only part that was my own idea) drop them in a bowl of shredded dried coconuts. Presto! My sticky balls were now hairy and not so sticky.

Hold my balls in the palm of your hand and feel their dense heft. Just don't squeeze them too hard or they will lose their shape and make your hands sticky.

And delicious! People just can't keep my balls out of their mouths! The salt from my nuts and the sweet from the fruit makes a delicious balance that is just right! But if you really want to make it even better, try dipping my balls in honey before you pop them in your mouth.

I can't wait to serve them at a party. I'm sure they will be a big hit. I can just imagine all the people tweeting about it from their iPhones. "Eric's Hairy Balls are so delicious!"

Saturday, September 21, 2013

2x4 Bus Bench

2x4 Bus Stop Bench
So, now that the kids go to the Elementary down the mountain, they take the bus. Luckily, it is right in front of the driveway.But they didn't have anyplace to sit and watch for the bus. So, I as usual looked to the internet and found the solution to my problem. Thank You Jay's Custom Creations! I googled 2x4 bench and found the perfect plans. I did modify them slightly- As you can see I have only two 2x4s for the backrest instead of 5. Mostly that is because here in Japan, they don't sell 8' 2x4s, and I didn't want to buy an extra twelve footer. Well, anyway, I used some graph paper, drew some simple models and made a new cut list using four 12' 2x4s. Then I lost that paper and just winged it. It went OK.But seriously, Jay made great plans, easy to follow, and easy to adapt to your needs. 

All told, it took about an hour to cut and screw this bench together. I think it took me longer to gather my tools from their various hiding places than it did to make it. 

My helper and one of the main users of the bench.